


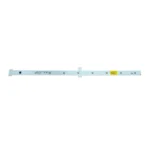
Insect-O-Cutor Infiniti UV 8 LED Strip – LED8S
These exceptional LED strips feature a distinctive design and boast an impressive UV output lifespan of 3 years, significantly reducing the need for frequent servicing and inventory management. With a wavelength of 368nm, these UV strips provide optimal performance for a range of applications. Trust the reliability and efficiency of Infiniti UV 8 LED Strip – LED8S to enhance your UV lighting setup.
Specifications
- Model: LED8S
- LED Type: UV
- Wavelength: 368nm
- Lifespan: 3 years
- Compatibility: Compatible with Infiniti UV LED lighting systems
Instructions for Use
Note: LED strip replacement should be carried out by service personnel only after ensuring that the unit is disconnected from the mains supply. LED strips should be replaced every three years.
- Replacing the old LED Strip
- Open the front guard of the unit and remove the glueboard.
- Face the unit and slide the old LED strip to the right until the strip connector on the left is clear of the housing. Utilize the protrusion on the top of the strip to help with pushing the LED strip.
- Slide the LED strip up until it is clear of the spring clips. Use the protrusion on the bottom of the strip to assist.
- Lift the strip away from the unit.
- Installing a new LED Strip
- Face the unit and hold the new LED strip with the LEDs facing you and the connector on your left.
- Position the new LED strip just above the spring clips and ensure it lies flat against the back face of the unit.
- Slide the LED strip down and under the spring clips until the lower edge of the strip stops against the body of the unit.
- Slide the LED strip to the left into the housing until the LED strip is securely connected. Confirm the proper fitting of the LED strips by closing the front guard and reconnecting the mains power. If the LEDs do not light up, disconnect the power, open the front guard, and ensure that the LED strips are fully engaged. Once confirmed, the glueboard can be inserted.
Instruction Manual
- Instruction Manual (pdf)
Video